 For many of us, our websites are our lifeblood. They are how we make our living, and how we support our families. They are our businesses and our passions. The interesting thing about how important our websites are to us is that precious few of us actually take regular backups of our data. Why is this? No one knows, really. Likely it’s that each of us figures it’ll always be someone else who loses their data in some catastrophic event.
For anyone who’s familiar with Apple’s Time Machine functionality, our CodeGuard is very similar except it’s for your hosting server rather than your home computer. When you sign up with CodeGuard, you provide it the necessary credentials in order to access your data and take a complete backup. After that point, it regularly monitors your server for any changes. Any time CodeGuard detects a change (files being added, removed, or modified), it then takes an incremental backup and sends you an email to inform you of the fact.
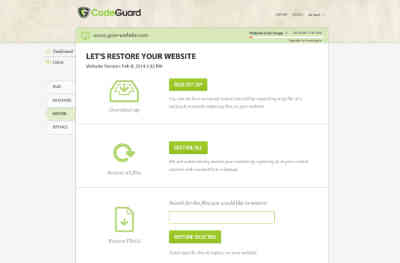
It’s the next feature that really sets CodeGuard apart: it allows you to restore back to any prior version of your website. All backups are stored in the cloud and you have multiple options for retrieving that data. You can, at any time, download a full .zip of your backup, choose an automatic full restore, or simply restore a single file or folder that you may have accidentally nuked. Basically, you have total control over your files with full accessibility at all times. CodeGuard protects your data from catastrophic potentialities, and it can certainly protect you from yourself in some instances.
To know what plan is best for you, prices, etc. Please contact us.
Connect Site

First, connect your site by giving CodeGuard your ftp/sftp/MySQL information. It's that easy.
The first step in activating CodeGuard is to connect your website or database with our servers. There are several options available, and the right one depends on your level of sophistication, goals, and server configuration. At a high level, you really have two choices: (1) FTP/SFTP or (2) MySQL.
If you want to configure FTP/SFTP and MySQL backups, you have two options: use our cPanel or Plesk plugins, which will create an FTP user and password for you automatically, or enter the credentials yourself, manually.
Pros and Cons
| FTP | SFTP | MYSQL |
|
|
|
|
|
|
To know what plan is best for you, prices, etc. Please contact us.
Initial Backup
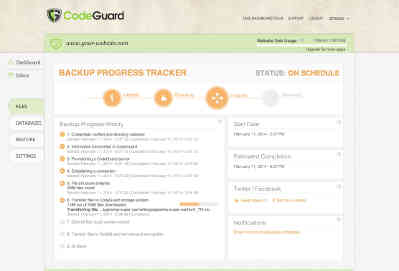
Now we take an initial backup of your site. During the process, you’ll be able to view real-time updates on its progress.
The initial website or database backup is a complete data retrieval of all files that CodeGuard has access to. Depending on the number of files and total size, the initial backup can take up to 72 hours. After this first backup, future backups are differential, both in the files that are transferred and the files that are stored on your behalf. CodeGuard relies upon a queueing system and our backup process is not unlike FedEx package pickup and delivery. Our process is so similar, in fact, that we modeled our user experience after their process.
The four main steps of the initial backup are (i) process initiation (ii) file pick up (iii) file transit, and (iv) final delivery. Process initiation contains verifying the credentials and transmitting them to CodeGuard. File pick up begins with an analysis of the file structure and creation of a git repository within Amazon’s Elastic Compute Cloud (EC2). The transit process begins after the file structure has been analyzed and the list of the files to be transmitted is finalized.
Files are then transferred to EC2. After all files are transferred to EC2, they are committed to the git repository on EC2, but do not remain there for long. As soon as the git commit is finished, the files are compressed and sent to Amazon Simple Storage Service (S3), where they are encrypted using industry-leading AES 256 bit techniques. The last step of process is the deletion of the files from their temporary storage on EC2.
To know what plan is best for you, prices, etc. Please contact us.
Detailed Walkthrough
Static Content (FTP/SFTP)
We capture all file content and the process can take up to two days depending on the size of your site, number of files on your site, and the wait in the queue. All subsequent backups will not take as long or be as resource intensive.
- Test the connection to the site using the same protocol (FTP, SFTP) that backup will use
- Create a Git repository on the local server instance (i.e. EC2)
- Build a list of files for the site
- Add all of those files to the download queue
- Download each file to the Git repository (on the local machine)
- Commit all the downloaded files to the Git repository
- Create a tarred and gzipped archive of the Git repository
- Upload the archive to Amazon S3 which simultaneously encrypts the archive and all of its content
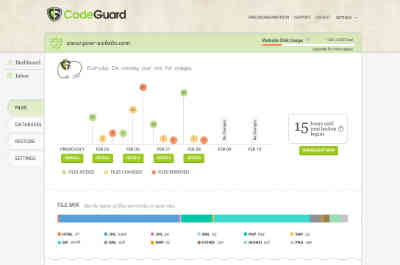
- Build the file mix
- Record the statistics from the backup
To know what plan is best for you, prices, etc. Please contact us.
Dynamic Content Overview (FTP/SFTP)
The database backups are stored as flat text files and the content of the text files is a list of executable SQL statements which, when run, will recreate the database in it’s entirety. The tables are stored this way so that when a user initiates a restore, no transformation of the data is needed. It can be run as-is to restore the database.
We connect and export the entire contents of the database using mysqldump. This provides us with the database schema (the list of all of the database tables and the columns they contain). The content of the database tables is then transformed into a format that allows us to use version control (Git) to track the changes made to your data. The specific flow of the process is as follows. The process is sequential and a failure at any step will stop the process:
To know what plan is best for you, prices, etc. Please contact us.
Monitoring Overview

Now we monitor your site daily for changes, and send a change alert email to you if there are any.
CodeGuard notifies you anytime anything changes within the source code of your website. Additions, modifications, and deletions between each version of your website can be viewed in your dashboard. Email notifications are also sent to inform users of what has changed. This is accomplished through two main vehicles: the front-end comparison analysis engine, and version control systems on the back-end.
To reduce the loads on our users’ servers, CodeGuard only transmits the files that have changed, as opposed to complete backups each time. The way CodeGuard determines which files have changed is with our comparison analysis engine. This engine lists and then compares the files with the previous backup. If any changes are found, only the changed files are transmitted.
The changed files are received in CodeGuard’s servers, and then placed in git, creating a new backup for the website. Since database files can be reduced to small sizes, no up-front comparison is performed on the database. CodeGuard simply compresses the databases and sends for analysis by the back-end version control system. Database additions can be seen by logging into the dashboard, and are located below the site content backup charts.
To know what plan is best for you, prices, etc. Please contact us.
Detailed Walkthrough
Static Content (FTP/SFTP)
CodeGuard uses SFTP/FTP to list all of the files and folders in your site, just like you would with an FTP client. Any folders, and the files within them, that were unselected during the initial backup are not checked. The duration of this process varies based on the number of files in your site and their sizes.
- Once the full list of files has been created, CodeGuard compares the list of files to the list received during the previous backup. Any files that have changed are marked to be downloaded
-
Changed files are based on a number of factors:
- File size
- Last modification time
- User or group ownership
- File permissions
Dynamic Content (FTP/SFTP)
There isn’t a ‘Monitoring’ process for MySQL or the WP DB. We get all of the content all the time because there is no generic way to detect the changes since the last backup.
- Additions to the database can be viewed within the user dashboard. At the current time, users are not notified via email when additions are made to the database
To know what plan is best for you, prices, etc. Please contact us.
Backup Again
After monitoring we continuously backup your site again and again if we detect changes.
Backup Overview
If the monitoring process detects any changes to the website source code, the files that changed or were added are transmitted to the CodeGuard repository. If any files are deleted, a record of the deletions is also transmitted to the repository. For deletions, those files are removed from the repository; additions are added and changed are overwritten to form a new version of the backup, which is shown within the user’s dashboard.
Since database files can be reduced to small sizes, CodeGuard transmits the entire database, which is compared with the previous version; if changes are found, a new version appears in the user’s dashboard.
To know what plan is best for you, prices, etc. Please contact us.
Backup Comparisons
| FTP/SFTP SOURCE | MYSQL DATABASE |
|
All backups after the first only retrieve the the files that were marked as changed during the monitoring process. If no changes are detected, the process ends after the monitoring step. This is roughly the same process as the initial backup with a few exceptions. This process also includes the monitoring step which is detailed above. Steps that differ from the initial backup are in italics:
|
This process is the similar to the initial backup, with the addition of these two steps:
|
Restore
Finally, you can restore your site back to any previous version with the click of a button.
FTP/SFTP and WordPress Source Whole Site Restore
- Can be time consuming since we do a backup before doing the restore
- The ‘pre-restore’ backup is necessary to get the current state of the site. Things may have changed dramatically since the last completed backup
-
The process goes like this:
- The user selects the version to restore
- A backup is performed using the same process as ‘Backup Again’
- Two lists of site content are built: one of the version to be restored and one of the current state of the site
- The difference between those two sites produces discrete operations for files and folders. These operations are placed in a queue for processing
- The backup is downloaded (if it doesn’t already exist) and the version to be restored is checked out
- Open a connection to the host site
- Process the operations queue and log the results of each operation in this order: delete files, delete folders, create folders, upload files, and finally, change file permission
- Record the statistics from the restore
- Send email notifications
To know what plan is best for you, prices, etc. Please contact us.
FTP/SFTP and WordPress Source Individual File Restore
- Individual file restore happens without a ‘pre-restore’ backup
- User can select files using a typeahead that searches the files for a particular backup version
-
Process:
- User selects 1 - n files in the UI, which are directly added to the operations queue
- The site repo is downloaded and the version that contained the selected files is checked out
- Connection tested and opened using the appropriate client (FTP/SFTP)
- The selected files are uploaded, and their permissions are set
- Record the statistics from the restore
- Send email notifications
To know what plan is best for you, prices, etc. Please contact us.
MySQL Database Restore
- This process uses the MySQL client to perform the restore
-
Process:
- Download repo from S3
- Checkout target restore version
- Open connection to remote database using mysql directly or through a SSH tunnel
- Execute the database backup file
- Drops and recreates each table
- Imports table data
- Record the statistics from the restore
To know what plan is best for you, prices, etc. Please contact us.